
Using custom interactive transitions to dismiss a modal

Ever since iOS 7, users have been swiping from the left edge of the screen to go back. This swipe-back feature is interactive, so the animation tracks as you drag back and forth. It’s especially handy for larger devices because that back button keeps getting further and further away.
Modal windows slide up from the bottom of the screen by default. Typically, apps have an “x” icon on the top right that dismisses the modal. Wouldn’t it be nice to close the modal by dragging it down? There are already apps that do this, like the Moments tab in the Twitter app, for example.
In this tutorial, you’ll use a Custom UIViewController Transition to achieve this effect. A transition is the animation that plays when the app changes scenes, as in the case of a modal or push segue. This animation is very much like a movie. By default, it plays the built-in animation from beginning to end.
With a custom transition, you can create your own animation. Also, you can make this animation interactive where the progress follows your finger, just like a video player scrub bar.
Let’s get started, shall we?
Download the starter project
Click here to download the starter project zip file. The link points to the “starter” branch of the git repo.

The starter project is just a Single View Application with an additional ModalViewController (shown in green). There’s a button on each scene that opens or closes the modal.
Here’s the code so far:
Build and run. You should be able to open and close the modal by tapping on the buttons.
Create a custom animator
The first step toward making a custom transition is to create an animation. You’ll package this animation inside a special object called an animator. Some call it an “Animation Controller”, but it’s basically an object that conforms to the UIViewControllerAnimatedTransitioning protocol. This animator is responsible for playing your custom animation.

To keep things simple, your animation is going to mimic the default modal dismissal animation.
1. Create a new file
- Select File New File…
- Select iOS Source Swift File and click Next
- Name the file DismissAnimator and click Create
2. SubClass NSObject
Replace the contents of DismissAnimator.swift with the following code:
import UIKit

class DismissAnimator : NSObject {
}
So far this is just an empty class that inherits from NSObject in order to take advantage of the NSObjectProtocol.
3. Implement the animated transitioning protocol
Add the following class extension at the bottom of the source file, below the class body:
extension DismissAnimator : UIViewControllerAnimatedTransitioning {
    func transitionDuration(transitionContext: UIViewControllerContextTransitioning?) -> NSTimeInterval {
        return 0.6
    }

    func animateTransition(transitionContext: UIViewControllerContextTransitioning) {
    }
}
The animator adopts the UIViewControllerAnimatedTransitioning protocol, which has two required methods:
transitionDuration(_:): This is how long the animation is.
animateTransition(_:): This is the actual animation. You’ll add more code to this method momentarily.
4. Set the stage for the animation
Add the following guard statement inside the animateTransition(_:) method:
guard
    let fromVC = transitionContext.viewControllerForKey(UITransitionContextFromViewControllerKey),
    let toVC = transitionContext.viewControllerForKey(UITransitionContextToViewControllerKey),
    let containerView = transitionContext.containerView()
else {
    return
}
This unwraps a few objects that you’ll need for the animation.
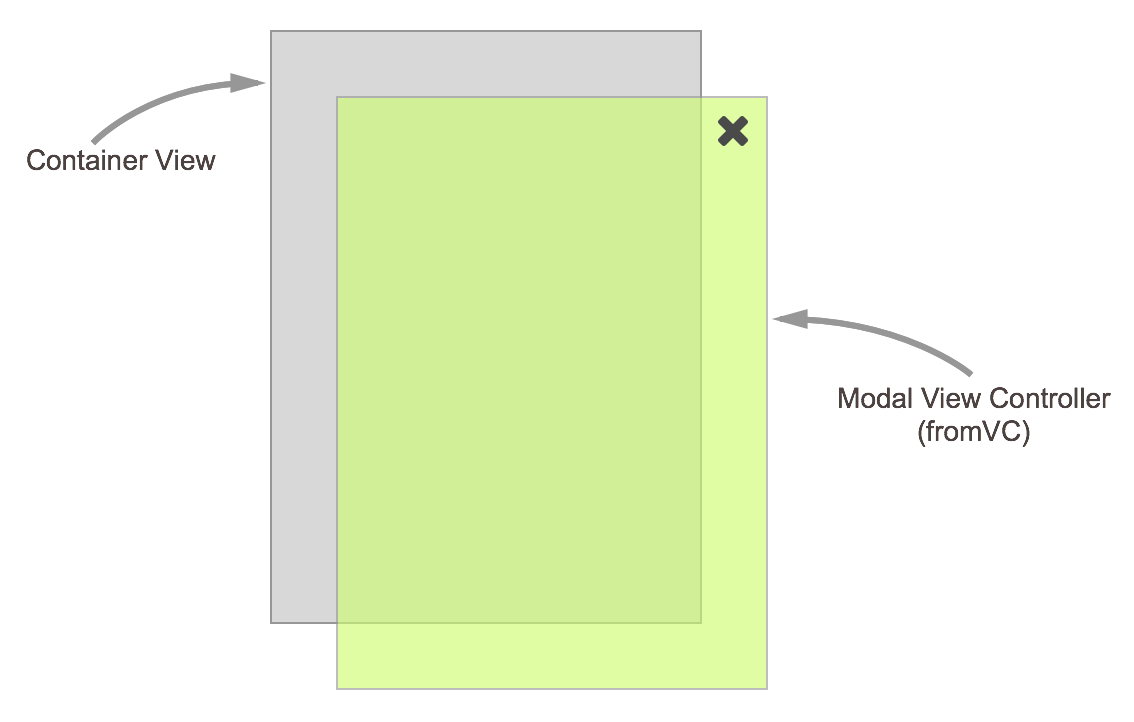
fromVC: This represents the Modal View Controller, which is the main actor of this show.
toVC: This is the parent View Controller that sits behind the modal.
containerView: Think of this as the device window, or the stage on which the animation plays.
By default, the animation begins with just the fromVC on stage. It’s your responsibility to add the toVC.
5. Add the “to” view controller
Append the following code to the animationTransition(_:) method:
containerView.insertSubview(toVC.view, belowSubview: fromVC.view)
This inserts the parent View Controller (toVC) behind the modal.

6. Create the animation
Append some more code to the animationTransition(_:) method:
let screenBounds = UIScreen.mainScreen().bounds
let bottomLeftCorner = CGPoint(x: 0, y: screenBounds.height)
let finalFrame = CGRect(origin: bottomLeftCorner, size: screenBounds.size)

UIView.animateWithDuration(
    transitionDuration(transitionContext),
    animations: {
        fromVC.view.frame = finalFrame
    },
    completion: { _ in
        transitionContext.completeTransition(!transitionContext.transitionWasCancelled())
    }
)
This code moves the fromVC downward by one screen length.
bottomLeftCorner: First, you create a CGPoint located on the bottom left corner of the screen. You use UIScreen to help figure out the height of the screen.
finalFrame: This is the destination frame of the modal, which is positioned one screen length below the viewable area. The origin is set to the bottomLeftCorner. And the size is based on the UIScreen size.
UIView.animateWithDuration(): This is a class method used to animate views.
transitionDuration(transitionContext): In an earlier step, you implemented a method that set the animation length to 0.6 seconds. This simply calls that method, so there’s just a single point of change.
animations: This is the block that defines the animation. Here, you move the modal from its starting frame to the destination frame.
completeTransition(): At the end of the custom animation, you call completeTransition(). In the next section, you’ll add an interactor that lets you back-out of a transition. Here, you pass a Boolean into completeTransition() to indicate whether the transition finished or needs to be rolled back.

What just happened?
So far, you have an animator object called DismissAnimator. This conforms to the UIViewControllerAnimatedTransitioning protocol, which packages the animation in a special format.
The transitionDuration(_:) method defines how long the transition lasts. This is kind of like the movie length timestamp found on a video player. Still going with the video player analogy, the animateTransition(_:) method defines the actual movie.
The animateTransition(_:) method gives you convenient access to something called a transitionContext. With the transitionContext, you create handles to the view controllers involved in the transition so you can animate them. You also use the transitionContext to figure out whether the transition completed successfully, so you could pass the status into completeTransition() when the animation ends.
Wire up the animator
For a modal segue, the default dismissal is a slide-down animation. You can override the default using a transitioning delegate.
Replace the contents of ViewController.swift with the following code:
import UIKit

class ViewController: UIViewController {
    override func prepareForSegue(segue: UIStoryboardSegue, sender: AnyObject?) {
        if let destinationViewController = segue.destinationViewController as? ModalViewController {
            destinationViewController.transitioningDelegate = self
        }
    }
}

extension ViewController: UIViewControllerTransitioningDelegate {
    func animationControllerForDismissedController(dismissed: UIViewController) -> UIViewControllerAnimatedTransitioning? {
        return DismissAnimator()
    }
}
This is what’s happening:
transitioningDelegate: When you set the transitioningDelegate, you can take manual control of any animated transitions to and from the destination view controller. prepareForSegue is your chance to set this value.
animationControllerForDismissedController(_:): This method overrides the default dismissal transition with your custom animation.

Build and run
Here’s the code so far:
Tap the Open Modal button, and then tap Close on the modal. It should behave just like the starter project.
Since it doesn’t seem like anything has changed, try temporarily changing the transitionDuration from 0.6 to something longer, like 3.0. If the animation is super slow, this is a good sign that everything is wired up properly.
[grwebform url=”https://app.getresponse.com/view_webform_v2.js?u=BK4gP&webforms_id=2855304″ css=”on” center=”off” center_margin=”200″/]
Create an interactor
An interactor lets you control the animation progress using a pan gesture. For the modal dismissal animation, you can drag vertically, and the modal will follow your finger. If you drag down far enough, the modal will dismiss. Otherwise, the modal will bounce back to the top and cancel the dismissal.
1. Create a new file
- Go to File New File…
- Select iOS Source Swift File and click Next
- Name the file Interactor and click Create
2. Subclass UIPercentDrivenInteractiveTransition
Replace the contents of Interactor.swift with the following code:
import UIKit

class Interactor: UIPercentDrivenInteractiveTransition {
    var hasStarted = false
    var shouldFinish = false
}
UIPercentDrivenInteractiveTransition: This class acts much like the scrub bar of the video player. It can track the animation progress to a certain position. It can also finish or cancel the transition. We’ll cover this more in a later section.
The Interactor subclass has two flags that serve as a state machine.
hasStarted: This tracks whether user interaction is in progress.
shouldFinish: This determines whether the transition should finish what it’s doing, or roll back to its original state.
Setup the pan gesture
You will use a pan gesture to drive the interactive transition.
a. In the Storyboard, drag a Pan Gesture Recognizer from the Object Library onto the Modal View Controller
b. Alt-click on ModalViewController.swift to open it side-by-side with the Storyboard
c. Right-click-drag from the Pan Gesture Recognizer to the ModalViewController class body
d. In the pop over, type in handleGesture as the name
e. Change the Connection to Action
f. Change the Type to UIPanGestureRecognizer and click Connect.
You should see the following code within ModalViewController.swift:
@IBAction func handleGesture(sender: UIPanGestureRecognizer) {
}
Wire up the pan gesture with the interactor
This is where all the magic happens. The pan gesture has different states such as .Began, .Ended, and .Changed. You will translate these state changes to corresponding method calls on the interactor.
1. Create a handle to the interactor
Add the following code to ModalViewController.swift:
var interactor:Interactor? = nil
The parent View Controller will pass in this object, and this is how they will share the same state.
2. Calculate the vertical drag distance
Add the following code to the handleGesture(_:) method:
let percentThreshold:CGFloat = 0.3

// convert y-position to downward pull progress (percentage)
let translation = sender.translationInView(view)
let verticalMovement = translation.y / view.bounds.height
let downwardMovement = fmaxf(Float(verticalMovement), 0.0)
let downwardMovementPercent = fminf(downwardMovement, 1.0)
let progress = CGFloat(downwardMovementPercent)
percentThreshold: This variable sets how far down the user has to drag in order to trigger the modal dismissal. In this case, it’s set to 30%.
translation: This converts the pan gesture coordinate to the Modal View Controller’s coordinate space.
verticalMovement: This converts the vertical distance to a percentage, based on the overall screen height.
downwardMovement: This captures movement in the downward direction. Upward movement is ignored.
downwardMovementPercent: This caps the percentage to a maximum of 100%.
progress: This casts the percentage to a CGFloat, which is the number type that the interactor expects.
3. Translate pan gesture states to interactor calls
Append the following code to the handleGesture(_:) method:
guard let interactor = interactor else { return }

switch sender.state {
case .Began:
    interactor.hasStarted = true
    dismissViewControllerAnimated(true, completion: nil)
case .Changed:
    interactor.shouldFinish = progress > percentThreshold
    interactor.updateInteractiveTransition(progress)
case .Cancelled:
    interactor.hasStarted = false
    interactor.cancelInteractiveTransition()
case .Ended:
    interactor.hasStarted = false
    interactor.shouldFinish
        ? interactor.finishInteractiveTransition()
        : interactor.cancelInteractiveTransition()
default:
    break
}
guard: This unwraps the interactor optional variable
.Began: The user just began dragging the modal. You call dismissViewControllerAnimated() to get the dismiss animation started, and set hasStarted to true.
For now, the modal dismisses every time you touch it. But in a later section, you’ll wire up the interactor to check for the hasStarted flag in order to take manual control of the animation.
.Changed: As the user drags vertically, the animation progress is set to a percentage based on how far the user dragged. If the user dragged further than the 30% threshold, you make a mental note to complete the transition.
.Cancelled: If for some reason the gesture is cancelled, the interactor also cancels by calling cancelInteractiveTransition(). Also, hasStarted is reset to the default state of false.
.Ended: The shouldFinish flag was set earlier based on whether the user dragged far enough to cross the threshold. Based on this flag, the interactor completes the transition with finishInteractiveTransition(), or backs out using cancelInteractiveTransition(). Also, hasStarted is reset to the default state of false.
There’s pretty much an one-to-one mapping between each pan gesture state to a method call on the interactor. When the pan gesture begins, the dismiss animation is triggered. As the pan gesture drags, the interactor updates the animation progress. And when the pan ends, the interactor either completes or rolls back the animation.
Wire up the interactor
The last piece of the puzzle is to wire up the interactor.
1. Add the following code to ViewController.swift:
let interactor = Interactor()
This creates the interactor object used by both the ViewController and ModalViewController.
2. Replace prepareForSegue with the following code:
override func prepareForSegue(segue: UIStoryboardSegue, sender: AnyObject?) {
    if let destinationViewController = segue.destinationViewController as? ModalViewController {
        destinationViewController.transitioningDelegate = self
        destinationViewController.interactor = interactor // new
    }
}
This passes the interactor object to the ModalViewController so that both controllers are using the same state machine.
3. Add the following method to the UIViewControllerTransitioningDelegate extension:
func interactionControllerForDismissal(animator: UIViewControllerAnimatedTransitioning) -> UIViewControllerInteractiveTransitioning? {
    return interactor.hasStarted ? interactor : nil
}
The hasStarted flag determines whether the animation goes into interactive mode. When the user is panning, the interactor is returned. But if the user taps the Close button, the normal animation is played out.
Build and run
Here’s the code so far:
Tap the Open Modal button.
Drag down slightly on the modal, and let go. It should snap back to the top.
Drag down about half-way, and let go. It should animate the rest of the way down, and dismiss.

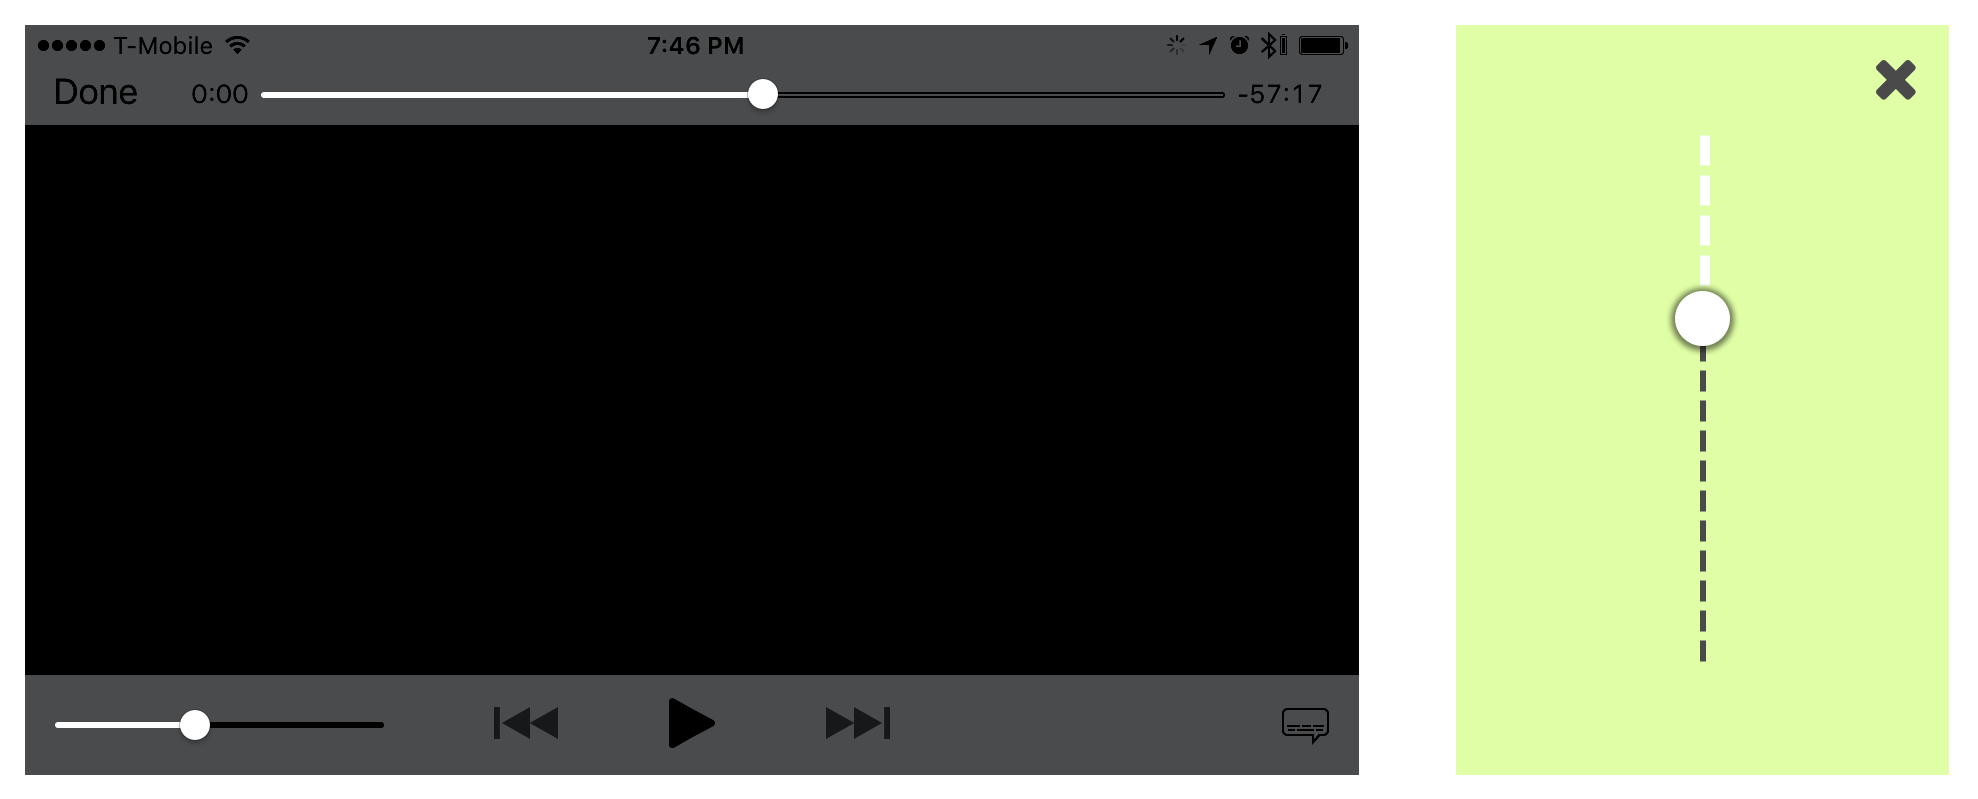
Add some coach marks
Users won’t know about hidden gestures unless you let tell them. Animations are a neat way to get the message across without blocking the app flow. In this section, you will create a little white ball that moves down the screen to represent the user’s potential finger movement.
Add the following code to ModalViewController.swift:
func showHelperCircle(){
    let center = CGPoint(x: view.bounds.width * 0.5, y: 100)
    let small = CGSize(width: 30, height: 30)
    let circle = UIView(frame: CGRect(origin: center, size: small))
    circle.layer.cornerRadius = circle.frame.width/2
    circle.backgroundColor = UIColor.whiteColor()
    circle.layer.shadowOpacity = 0.8
    circle.layer.shadowOffset = CGSizeZero
    view.addSubview(circle)
    UIView.animateWithDuration(
        0.5,
        delay: 0.25,
        options: [],
        animations: {
            circle.frame.origin.y += 200
            circle.layer.opacity = 0
        },
        completion: { _ in
            circle.removeFromSuperview()
        }
    )
}

override func viewDidAppear(animated: Bool) {
    showHelperCircle()
}
This is a quick and dirty snippet of code to demonstrate one possible animation. It programmatically creates a circle near the top of the screen. The circle is styled using properties like: cornerRadius, backgroundColor, shadowOpacity, and shadowOffset. The circle is animated downward while fading away.
Build and run
Here’s the code so far:
- ViewController.swift (no change)
- ModalViewController.swift
- DismissAnimator.swift (no change)
You should now see a white circle animate downward whenever the modal appears.
Conclusion
You can check out the completed project here.
Interactively dismissing a modal is just one potential use case for custom view controller transition APIs. If you want to learn more, I highly recommend this Ray Wenderlich tutorial.
I admit this topic is pretty tough to learn. The clearest explanation I’ve seen so far is in iOS 7 by Tutorials. Written in Swift, this book is still a good resource for learning iOS 7 APIs without having to mentally translate Objective-C on the fly.
Got any tips for working with custom transitions? Have any suggestions for future tutorial topics? Feel free to add your thoughts to the comments.
Like this post? Please share it! Then follow us on Twitter @thorntech or join our mailing list below for future updates.