Using Volley to Feed JSON data into an Android Application
When looking to parse JSON for use with Android, you may find there are different ways of doing so. Volley is a great choice as it runs network operations asynchronously by default, and can handle request queuing and cancellation simply and effectively.
Today I explain how to add Volley to an Android project and configure two different JSON requests.
JSON is an alternative to XML, and can be used in many ways to feed internet data into an Android application. It is faster to parse than XML and easier to read. JSON is useful in Android because it can be used to feed live data from a web host, such as articles from a regularly updated RSS feed.
In this tutorial, I use Android Studio as my IDE. You may follow this guide using Eclipse or a similar IDE, but setting up the Volley dependency may require additional steps.
Setup
Need a refresher on how to start a new project? Follow these Setup steps. Otherwise, skip on to Adding Volley to the Project.
To create a new project…
- Go to File -> New -> New Project.
- Choose an Application name. Click Next.
- Select a Minimum SDK for your Phone and Tablet For our examples API 16: Android 4.1 (Jelly Bean) will be sufficient, and it supports 94.8% of android devices. If you need more features, you can choose a later SDK version but your app will work on fewer devices. Click Next.
- When selecting a default activity, choose Empty Activity. Give your activity a name (default name is MainActivity), and you’ll see the layout name and title change accordingly. Click Finish when you’re ready to build your new project.
After the build finishes, you should be presented with a screen similar to this. Now that setup is complete, it’s time to add the Volley library to the project.
Adding Volley to the Project
There are multiple ways to add Volley to a project. The simplest way is adding the library as a Dependency in the build.gradle (module: app) file:
- Open build.gradle (module: app) by double clicking it.
- Look for the dependencies section, and add the line compile ‘com.mcxiaoke.volley:library:1.0.19’ between the brackets as shown.

A dialog message will appear mentioning that the Gradle files have changed since the last sync. This is true because of the line that was just added to the dependencies. Click Sync to rebuild the project, and now Android Studio knows Volley has been added as a dependency. Feel free to close the app tab.
Now that the project has Volley support, make sure that this app has permissions to access the internet.
- Expand the app package on the left hand side of the screen, then expand manifests.
- Double click on xml to open it for editing.
- Right above the application tag, add the line <uses-permission android_name=”android.permission.INTERNET”/> as shown.

The application now has permissions to access the internet. Feel free to close the AndroidManifest.xml tab.
For the following examples, example JSON files will be used. These files can be found at https://github.com/ianbar20/JSON-Volley-Tutorial/tree/master/Example-JSON-Files . To better understand how JSON files are organized, try looking at these example files in an online JSON parser, such as http://json.parser.online.fr/ . Feel free to use another JSON file, but note that the organization of the JSON request will differ from the examples.
Basic Example with JSON Object
To configure the JSON request, changes must be made to the main activity class (MainActivity.java in my case).
It should already be open in another tab in Android Studio. If it isn’t:
- Expand the java package, located within the app package on the left side of the screen
- Within java, expand your app-specific package (example.ian.basicexample in my case) to find the activity class.
- Double click the Main Activity class to open it for editing.
Add imports, define variables, and modify onCreate as shown. Refer to the code comments for explanations.
//NOTE: your package will be different than mine!
package com.example.ian.basicexample;

import android.support.v7.app.AppCompatActivity;
import android.os.Bundle;
import android.util.Log;
import android.widget.TextView;

import com.android.volley.Request;
import com.android.volley.RequestQueue;
import com.android.volley.Response;
import com.android.volley.VolleyError;
import com.android.volley.toolbox.JsonObjectRequest;
import com.android.volley.toolbox.Volley;
import org.json.JSONException;
import org.json.JSONObject;


public class MainActivity extends AppCompatActivity {
    // Will show the string "data" that holds the results
    TextView results;
    // URL of object to be parsed
    String JsonURL = "https://raw.githubusercontent.com/ianbar20/JSON-Volley-Tutorial/master/Example-JSON-Files/Example-Object.JSON";
    // This string will hold the results
    String data = "";
    // Defining the Volley request queue that handles the URL request concurrently
    RequestQueue requestQueue;

    @Override
    protected void onCreate(Bundle savedInstanceState) {
        super.onCreate(savedInstanceState);
        setContentView(R.layout.activity_main);
        // Creates the Volley request queue
        requestQueue = Volley.newRequestQueue(this);

        // Casts results into the TextView found within the main layout XML with id jsonData
        results = (TextView) findViewById(R.id.jsonData);

        // Creating the JsonObjectRequest class called obreq, passing required parameters:
        //GET is used to fetch data from the server, JsonURL is the URL to be fetched from.
        JsonObjectRequest obreq = new JsonObjectRequest(Request.Method.GET, JsonURL,
                // The third parameter Listener overrides the method onResponse() and passes
                //JSONObject as a parameter
                new Response.Listener<JSONObject>() {

                    // Takes the response from the JSON request
                    @Override
                    public void onResponse(JSONObject response) {
                        try {
                            JSONObject obj = response.getJSONObject("colorObject");
                            // Retrieves the string labeled "colorName" and "description" from
                            //the response JSON Object
                            //and converts them into javascript objects
                            String color = obj.getString("colorName");
                            String desc = obj.getString("description");

                            // Adds strings from object to the "data" string
                            data += "Color Name: " + color +
                                    "nDescription : " + desc;

                            // Adds the data string to the TextView "results"
                            results.setText(data);
                        }
                        // Try and catch are included to handle any errors due to JSON
                        catch (JSONException e) {
                            // If an error occurs, this prints the error to the log
                            e.printStackTrace();
                        }
                    }
                },
                // The final parameter overrides the method onErrorResponse() and passes VolleyError
                //as a parameter
                new Response.ErrorListener() {
                    @Override
                    // Handles errors that occur due to Volley
                    public void onErrorResponse(VolleyError error) {
                        Log.e("Volley", "Error");
                    }
                }
        );
        // Adds the JSON object request "obreq" to the request queue
        requestQueue.add(obreq);
    }
}
An error will occur if the project is built now, as the TextView jsonData has not been created yet. To create this TextView, modify the main layout .XML file. It should already be open in another tab. If it isn’t:
- Expand the res package on the left hand side of the screen, then expand layout.
- Double click on the main layout XML (default name activity_main.xml ) to open it for editing.
When opening the main layout XML for the first time, the design tab will show. It isn’t immediately obvious, but to edit the layout code click the Text tab.

Now that the main layout XML is ready to edit, replace the existing code with
<?xml version="1.0" encoding="utf-8"?>
<ScrollView xmlns_android="http://schemas.android.com/apk/res/android"
    xmlns_tools="http://schemas.android.com/tools"
    android_layout_width="match_parent"
    android_layout_height="wrap_content"
    android_layout_marginLeft="16dp"
    android_layout_marginRight="16dp"
    tools_context="com.example.ian.basicexample.MainActivity">

    <TextView
        android_layout_width="wrap_content"
        android_layout_height="wrap_content"
        android_layout_gravity="center_horizontal"
        android_textAppearance="?android:attr/textAppearanceLarge"
        android_text="Large Text"
        android_textSize="20sp"
        android_textStyle="bold"
        android_id="@+id/jsonData"
        android_textColor="#000000" />

</ScrollView>
The main activity has a single TextView within a ScrollView. The ScrollView allows the user to scroll through the TextView if it goes outside the bounds of the device screen.
The first example application is now finished. To test it, run it on Android Studio’s device emulator.
- Click the Run button ( ) to open the Device Chooser.
- Select Launch Emulator, then click the … button at the end of the Android virtual device line to open the Android Virtual Device Manager.
- Click +Create Virtual Device…
- Select a phone or tablet to emulate, and click Next.
- In the System Image window, click Next.
- Set a name for the created device, or keep the default name. Click Finish.
- Return to the Device Chooser window, select the new device in the list, and click OK.
- The emulator will launch and the application will build once the emulator finishes booting.

Congratulations, the first example project has been completed! This is the final result. A ScrollView holds a TextView, which is populated with strings retrieved from a JSON object file.
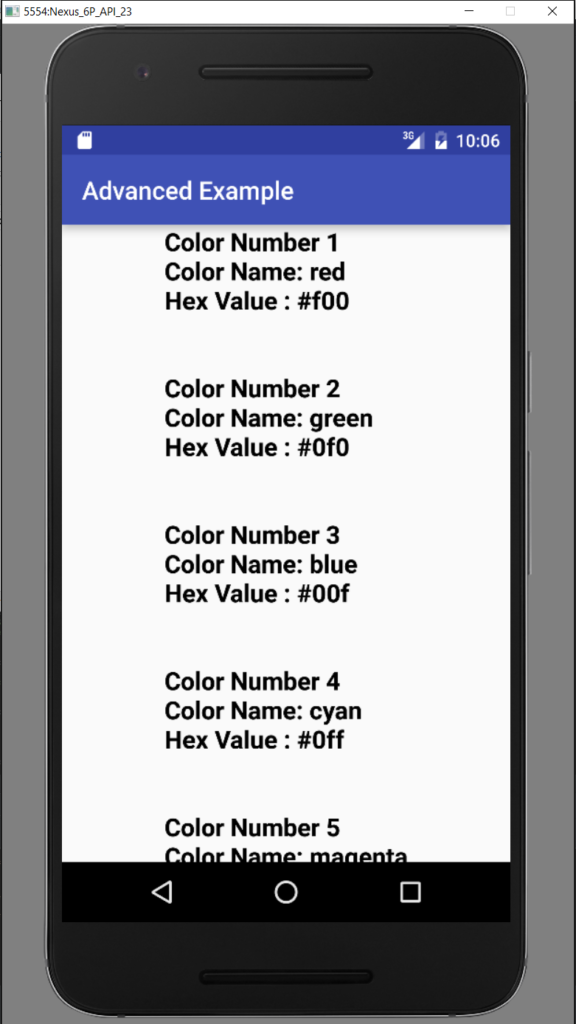
Advanced Example with JSON Array
The JsonObjectRequest isn’t the only way to parse JSON. If the JSON file begins with an array, JsonArrayRequest must be used. The Array request can be configured in the exact same way as the object request.
The biggest difference between the last example and this example is the concept of nested objects and arrays. Here, the goal is to retrieve strings from objects within the colorArray array, which is within the first object of the JSON array. That is to say, an object within an array within an object within an array. Whew! As can be expected, the organization of the request must change to match the target JSON file.
After adding Volley to the project and ensuring the application has proper permissions, it’s time to configure the main activity where the request will take place. It should already be open in another tab in Android Studio. If it isn’t:
- Expand the java package, located within the app package on the left side of the screen
- Within java, expand your app-specific package (com.example.ian.basicexample in my case) to find the activity class.
- Double click the Main Activity class to open it for editing.
Add imports, define variables, and modify onCreate as shown. Refer to the code comments for explanations.
//NOTE: your package will be different than mine!
package com.example.ian.advexample;

import android.support.v7.app.AppCompatActivity;
import android.os.Bundle;
import android.util.Log;
import android.widget.TextView;

import com.android.volley.RequestQueue;
import com.android.volley.Response;
import com.android.volley.VolleyError;
import com.android.volley.toolbox.JsonArrayRequest;
import com.android.volley.toolbox.Volley;
import org.json.JSONArray;
import org.json.JSONException;
import org.json.JSONObject;


public class MainActivity extends AppCompatActivity {
    // Will show the string "data" that holds the results
    TextView results;
    // URL of object to be parsed
    String JsonURL = "https://raw.githubusercontent.com/ianbar20/JSON-Volley-Tutorial/master/Example-JSON-Files/Example-Array.JSON";
    // This string will hold the results
    String data = "";
    // Defining the Volley request queue that handles the URL request concurrently
    RequestQueue requestQueue;

    @Override
    protected void onCreate(Bundle savedInstanceState) {
        super.onCreate(savedInstanceState);
        setContentView(R.layout.activity_main);
        // Creates the Volley request queue
        requestQueue = Volley.newRequestQueue(this);

        // Casts results into the TextView found within the main layout XML with id jsonData
        results = (TextView) findViewById(R.id.jsonData);

        // Creating the JsonArrayRequest class called arrayreq, passing the required parameters
        //JsonURL is the URL to be fetched from
        JsonArrayRequest arrayreq = new JsonArrayRequest(JsonURL,
                // The second parameter Listener overrides the method onResponse() and passes
                //JSONArray as a parameter
                new Response.Listener<JSONArray>() {

                    // Takes the response from the JSON request
                    @Override
                    public void onResponse(JSONArray response) {
                        try {
                            // Retrieves first JSON object in outer array
                            JSONObject colorObj = response.getJSONObject(0);
                            // Retrieves "colorArray" from the JSON object
                            JSONArray colorArry = colorObj.getJSONArray("colorArray");
                            // Iterates through the JSON Array getting objects and adding them
                            //to the list view until there are no more objects in colorArray
                            for (int i = 0; i < colorArry.length(); i++) {
                                //gets each JSON object within the JSON array
                                JSONObject jsonObject = colorArry.getJSONObject(i);

                                // Retrieves the string labeled "colorName" and "hexValue",
                                // and converts them into javascript objects
                                String color = jsonObject.getString("colorName");
                                String hex = jsonObject.getString("hexValue");

                                // Adds strings from the current object to the data string
                                //spacing is included at the end to separate the results from
                                //one another
                                data += "Color Number " + (i + 1) + "nColor Name: " + color +
                                        "nHex Value : " + hex + "nnn";
                            }
                            // Adds the data string to the TextView "results"
                            results.setText(data);
                        }
                        // Try and catch are included to handle any errors due to JSON
                        catch (JSONException e) {
                            // If an error occurs, this prints the error to the log
                            e.printStackTrace();
                        }
                    }
                },
                // The final parameter overrides the method onErrorResponse() and passes VolleyError
                //as a parameter
                new Response.ErrorListener() {
                    @Override
                    // Handles errors that occur due to Volley
                    public void onErrorResponse(VolleyError error) {
                        Log.e("Volley", "Error");
                    }
                }
        );
        // Adds the JSON array request "arrayreq" to the request queue
        requestQueue.add(arrayreq);
    }
}
An error will occur if the project is built now, as the TextView with the id jsonData has not been created yet. To create this TextView, modify the main layout .XML file. It should already be open in another tab. If it isn’t:
- Expand the res package on the left hand side of the screen, then expand layout.
- Double click on the main layout XML to open it for editing.
Modify the layout as shown.
<?xml version="1.0" encoding="utf-8"?>
<ScrollView xmlns_android="http://schemas.android.com/apk/res/android"
    xmlns_tools="http://schemas.android.com/tools"
    android_layout_width="match_parent"
    android_layout_height="wrap_content"
    android_layout_marginLeft="16dp"
    android_layout_marginRight="16dp"
    tools_context="com.example.ian.advexample.MainActivity">

    <TextView
        android_layout_width="wrap_content"
        android_layout_height="wrap_content"
        android_layout_gravity="center_horizontal"
        android_textAppearance="?android:attr/textAppearanceLarge"
        android_text="Large Text"
        android_textSize="20sp"
        android_textStyle="bold"
        android_id="@+id/jsonData"
        android_textColor="#000000" />

</ScrollView>
The main activity has a single TextView within a ScrollView. The ScrollView allows the user to scroll through the TextView, if it goes outside the bounds of the device screen.
The second example application is now finished. To test it, run it on Android Studio’s device emulator.
- Click the Run button ( ) to open the Device Chooser.
- Select Launch Emulator, then click the … button at the end of the Android virtual device line to open the Android Virtual Device Manager.
- Click +Create Virtual Device…
- Select a phone or tablet to emulate, and click Next.
- In the System Image window, click Next.
- Set a name for the created device, or keep the default name. Click Finish.
- Return to the Device Chooser window, select the new device in the list, and click OK.
- The emulator will launch and the application will build once the emulator finishes booting.

Congratulations, the first example project has been completed! This is the final result. A ScrollView holds a TextView, which is populated with strings retrieved from a JSON array.
Conclusion
Two example applications are now complete.
One simply reads in strings parsed from a JSON object. The other reads in strings parsed from an object within an array, within an object, within a JSON array.
These examples feed the retrieved data into a single TextView, but parsed data from a JSON source can be used for almost anything.
Now that you know the basics of parsing JSON with Volley, you can experiment with using different JSON sources, and try using the retrieved data for other purposes.
Thank you for reading my tutorial on using Volley to parse JSON in Android! If you have any questions or suggestions, please comment below.
Like this post? Please share it using the share buttons to the left! Then join our mailing list below and follow us on Twitter – @thorntech – for future updates.