
Setting up a webserver to use HTTPS used to be a challenging task, but Amazon Web Services has made it much easier to get your secure server up and running. However, it can still be a little tricky to put all the pieces together.
This article walks you through the entire process, from purchasing an SSL certificate to deploying it to an Elastic Load Balancer (ELB) instance running at Amazon Web Services.
Here’s how to do it.
Purchase Your SSL Certificate
I recommend using Namecheap to purchase your SSL certificate because it is simple and inexpensive.
If you can spare the cost, I highly recommend purchasing a wildcard domain. This will allow you to add the certificate to your AWS account once, and use if for all the subdomains you may create in the future.
Purchasing a certificate is a little confusing because once you pay for it, nothing happens until you activate it.
Activate Your SSL Certificate
After you purchase the SSL certificate, you need to activate it in order to receive the certificate files.
In order to activate it, you need to generate a Certificate Signing Request (CSR). This can be done from any Linux or OSX command line using the command below.
openssl req -new -newkey rsa:2048 -nodes -keyout server.key -out server.csr
I usually end up doing this directly on the EC2 instance I am working with. Amazon does a great job keeping their default Linux AMI current with all the latest tools and security patches. So the command will work just fine on an Amazon Linux AMI.
You will then be prompted for a number of questions, as shown below. You can just hit Enter on most of the fields to use the default value. The important field is the “Common Name” field. This must be the hostname of your server. If you purchased a wildcard certificate, it must begin with an asterisk (‘*’); for example *.thorntech.com. Otherwise, use your full hostname, like www.thorntech.com. Do not specify a challenge password in the CSR.
[ec2-user@ ssl_setup]$ openssl req -new -newkey rsa:2048 -nodes -keyout server.key -out server.csr
Generating a 2048 bit RSA private key
..........................................................+++
...........................+++
writing new private key to 'server.key'
-----
You are about to be asked to enter information that will be incorporated
into your certificate request.
What you are about to enter is what is called a Distinguished Name or a DN.
There are quite a few fields but you can leave some blank
For some fields there will be a default value,
If you enter '.', the field will be left blank.
-----
Country Name (2 letter code) [XX]:US
State or Province Name (full name) []:Maryland
Locality Name (eg, city) [Default City]:
Organization Name (eg, company) [Default Company Ltd]:ThornTech
Organizational Unit Name (eg, section) []:Dev
Common Name (eg, your name or your server's hostname) []:*.thorntech.com
Email Address []:info@thorntech.com

Please enter the following 'extra' attributes
to be sent with your certificate request
A challenge password []:
An optional company name []:

[ec2-user@ ssl_setup]$ ll
total 8
-rw-rw-r-- 1 ec2-user ec2-user 1066 Aug 18 15:21 server.csr
-rw-rw-r-- 1 ec2-user ec2-user 1704 Aug 18 15:21 server.key
Once you have the CSR generated, you need to provide it to the domain registrar from whom you purchased the SSL certificate.
In the case of Namecheap, you can paste it into the form they provide on the Manage SSL Certificates page.
Once you upload the CSR, they need to verify that you own the domain that was provided in the CSR “Common Name” field. They will send an activation link to one of several email addresses associated with the domain, such as admin@mydomain.com.
You can also choose the email address listed on the WHOIS record for the domain name. It is critical that you have access to the email account you choose or you will not be able to validate the domain. Once you select the email address to use, the certificate authority will send a validation code and a link to the email address you selected. Click on the link and provide the verification code they gave you.
Receive and Save Your SSL Certificate
Once you provide the correct verification code, they will email the final certificate to you. The file will come as ZIP file attachment. The zip file will include 4 files:
- Root CA Certificate – AddTrustExternalCARoot.crt
- Intermediate CA Certificate – COMODORSAAddTrustCA.crt
- Intermediate CA Certificate – COMODORSADomainValidationSecur
eServerCA.crt - Your PositiveSSL Wildcard Certificate – STAR_thorntech_com.crt
Save this zip file in a safe place. You will need all of these files when you set up your instance on AWS.
Use Your Certificate with an Amazon Elastic Load Balancer
The easiest way to provide HTTPS access to web resources running in your AWS instance is to set up an Elastic Load Balancer and configure it with your new SSL certificate. This lets Amazon handle the certificate configuration for you so you don’t have to worry about making sure your specific web server is configured properly to support HTTPS.
Follow the AWS Console Elastic Load Balancer Setup Wizard to begin creating a new Elastic Load Balancer. On the first screen, make sure you add Protocols for HTTPS. You can have HTTP as well if you want to provide non-encrypted access to your resources.
Select the Security Group for your Elastic Load Balancer. If you are creating your ELB inside a VPC, you should probably select the default security group which will allow inbound traffic from all other instances in the security group and outbound traffic to anywhere.
The third screen is the tricky one. This is where we set up our SSL Certificate for the first time. The good news is that once you complete this process, you can just keep using the same certificate for other subdomains you might create in the future. You need the wildcard certificate in order to do this, of course.
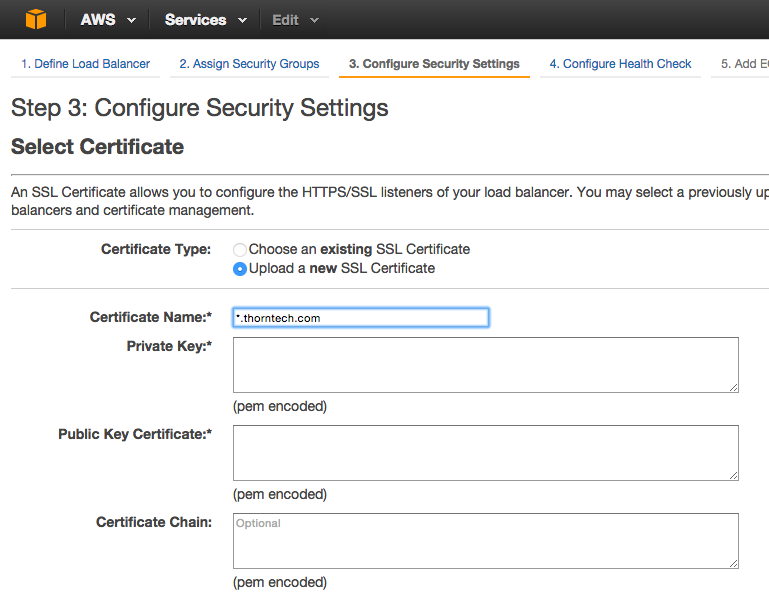
We have a little work to do to get the pem encoded fields shown in the form above. The Amazon Identity and Access Management Service (IAM) will manage your new SSL certificate. This service requires all your certificates to be in PEM format, which may not be the format provided by the Certificate Authority. The basics for this setup are outlined in the AWS documentation here.
However, this documentation is not very clear on how you get the pem encoded values you are supposed to provide in the fields above. The procedure to obtain each of these fields is described elsewhere in the ELB Documentation. They are also outlined below.
Private Key
The private key you created in the beginning along with your CSR may not be in PEM format, which AWS IAM requires. Use the command below to create a private key in PEM format.
openssl rsa -in server.key -outform PEM > server.private.pem
Public Key Certificate
This is your actual certificate that you received from the certificate authority. It should be in the zip file you received in the email with a name like STAR_thorntech_com.crt .
Certificate Chain
The certificate chain is nothing more than the Intermediate CA Certificates from the Certificate Authority concatenated together. The Root certificate should be listed last.
cat COMODORSADomainValidationSecureServerCA.crt COMODORSAAddTrustCA.crt AddTrustExternalCARoot.crt > server.chain
Upload Your SSL Certificate
You can copy and paste the contents from all these files into the form shown in Figure 1.
I have found this to be a little tedious, however. Whether you’ve made a copy and paste error, or perhaps you simply chose the wrong file, you rarely get it right the first time. The AWS console forces you to go through the entire ELB setup wizard only to tell you at the end that your SSL keys are wrong.
So instead, I find that it is much easier to create our IAM SSL Certificate from a terminal console. Then when you use the ELB setup wizards, you can simply select an existing SSL Certificate. You can create the certificate from the command line using the following command:
aws iam upload-server-certificate --server-certificate-name star.thorntech.com --certificate-body file://STAR_thorntech_com.crt --private-key file://server.private.pem --certificate-chain file://server.chain
Once this command executes without errors, you should be able to choose your certificate name (e.g. star.thorntech.com) from the drop down list next to “Choose existing SSL Certificate” when setting up your ELB.
The remaining steps of setting up the ELB are documented very well by Amazon.
Conclusion
The aim of this post was to walk you through setting up an SSL Certificate for use with Amazon Web Services. While Amazon Web Services has made it much easier to set up a secure server quickly, there are still a number of steps you need to execute to get it right and put it all together.
Let us know in the comments if you have any questions or problems!
Have any suggestions for future tutorial topics? Feel free to add your thoughts to the comments.
Like this post? Please share it! Then follow us on Twitter @thorntech or join our mailing list for future updates.